
The testimonial rules page in Magic Testimonials Display App enables you to choose which testimonials are automatically accepted and displayed, left inactive (waiting for your action), or rejected (shows as inactive in the testimonials list).
Open the testimonial rules page.
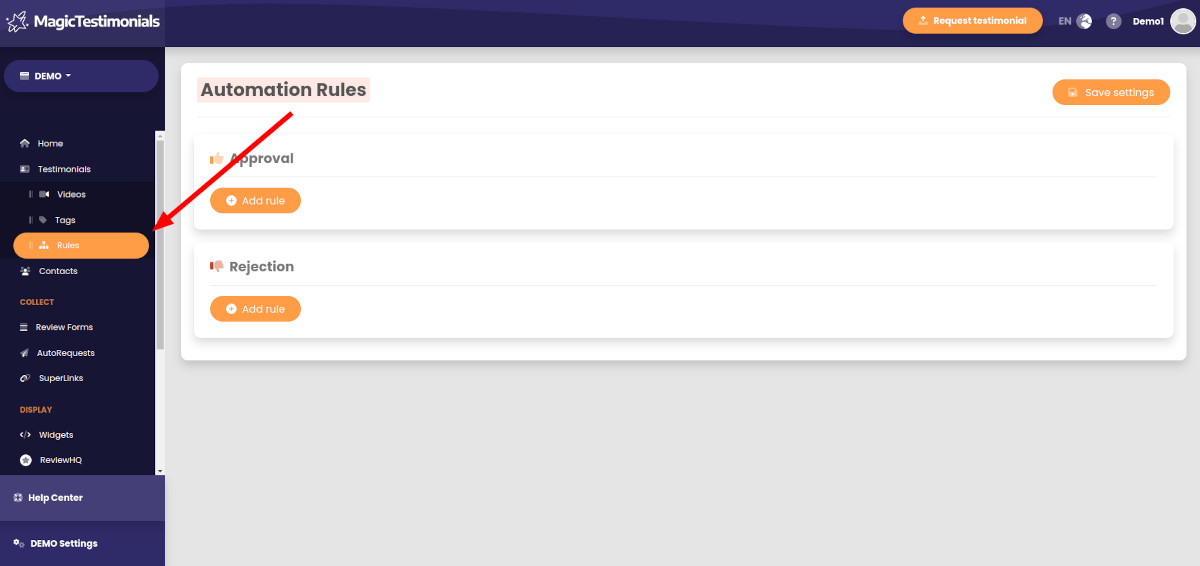
On this page there are two sections; “Approvals” and “Rejections“. In each section you will find an “Add Rule” button.
After clicking “Add Rule” in either section, you will see 3 input select boxes in a row:
- The first selection has two criteria; “Rating” and “Testimonial Source”.
If we select “Rating”:
- The second box has a list of operators for the rating number.
- The third box contains a list of ratings, from 1 to 5.
If we select “Testimonial Source”:
- The second box has “Equals” or “Not equals to”.
- The third box contains a list of testimonial sources.
Using a combination of these settings, it gives you full control over the automated acceptance or rejection of each testimonial that Magic Testimonials Display App collects from the available testimonial sources.
Approvals #
Here we choose the type of testimonials that you wish to automatically accept and display, without needing your intervention.
Let’s see some examples.
Example #1: Rating #
Aim: only testimonials with a rating of 4 or more will be automatically accepted and displayed.
- For the criteria, select “Rating” in the first box.
- Next choose the operator “Greater than or equal to” (second box).
- Then select the rating “4” (third box).
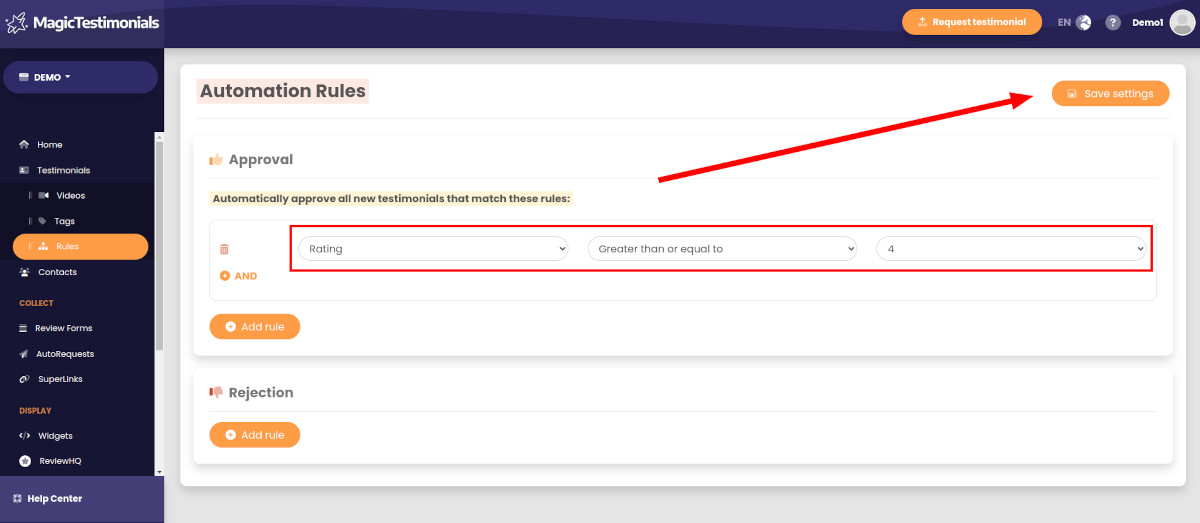
Click the “Save settings” button. That meets the objective for example #1.
Example #2: Rating and Testimonial Source #
Aim: display testimonials automatically with a rating of 5, except from Facebook. For those, we want to automatically accept any that have a 3 or higher rating.
In other words, any testimonial with a rating of 5 can be automatically accepted, regardless of the source. Let’s start with that.
- First, click the “Add Rule” button.
- Select “Rating” as the criteria.
- Choose the operator “Equals”.
- Select “5” as our accepted rating (third box).
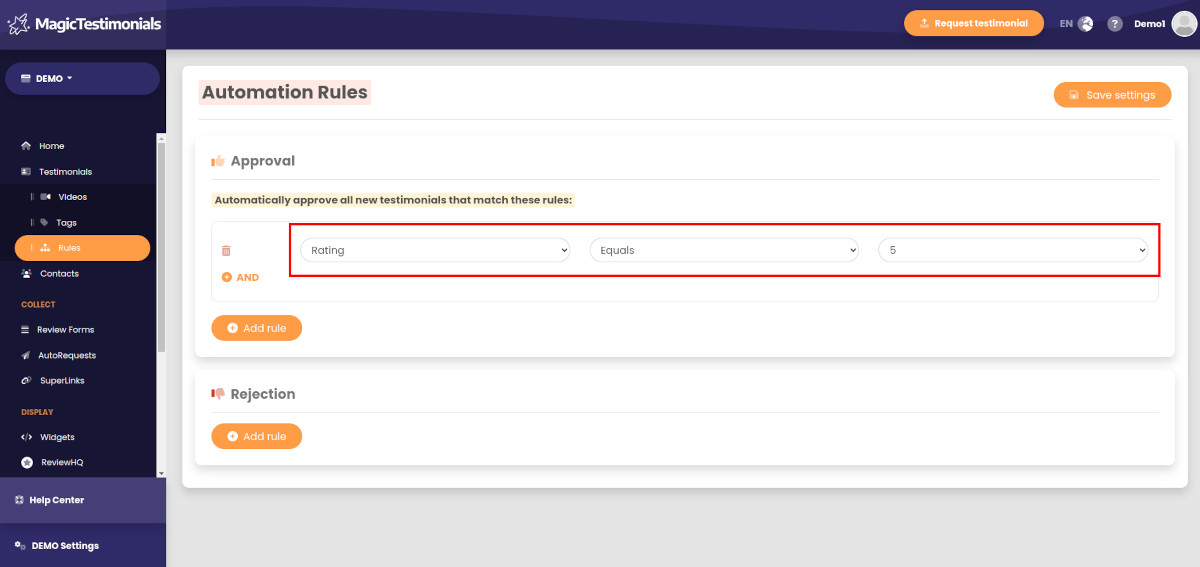
Now we move on to testimonials from Facebook.
- Again click “Add Rule”.
Note: You will notice “OR” appears between our rules (because either the first rule or this new rule will allow automatic acceptance)
- Select “Testimonial Source” as the criteria.
- Then select “Equals” (second box).
- Now for the testimonial source, choose “Facebook”.
Now below the boxes, click “AND”.
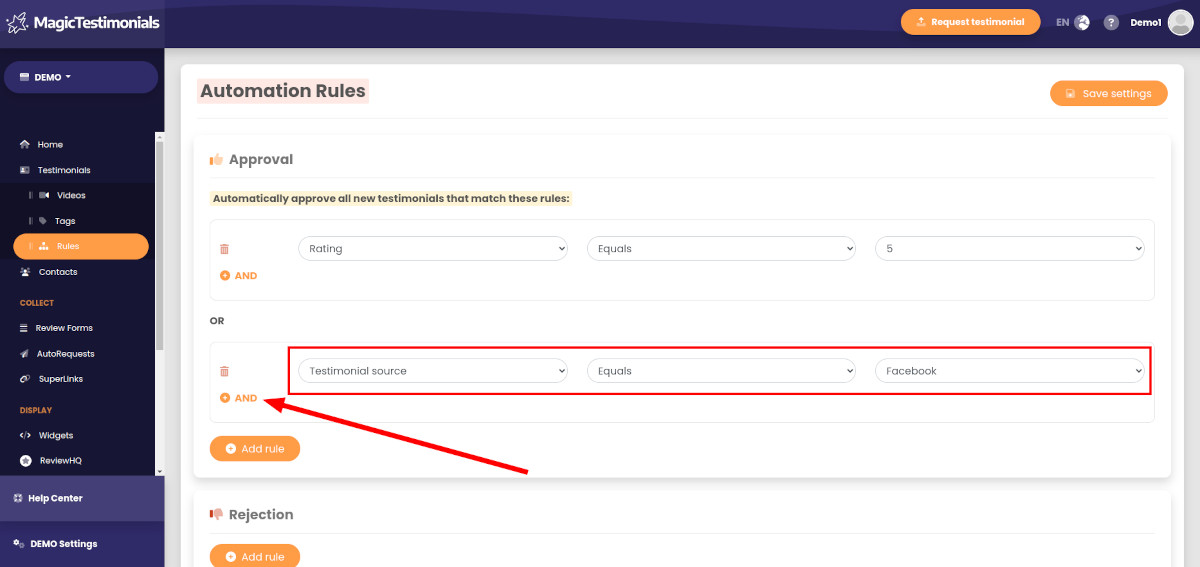
- Select “Rating”.
- Next choose “Greater than or equal to”.
- Then select “3” for the rating (third box).
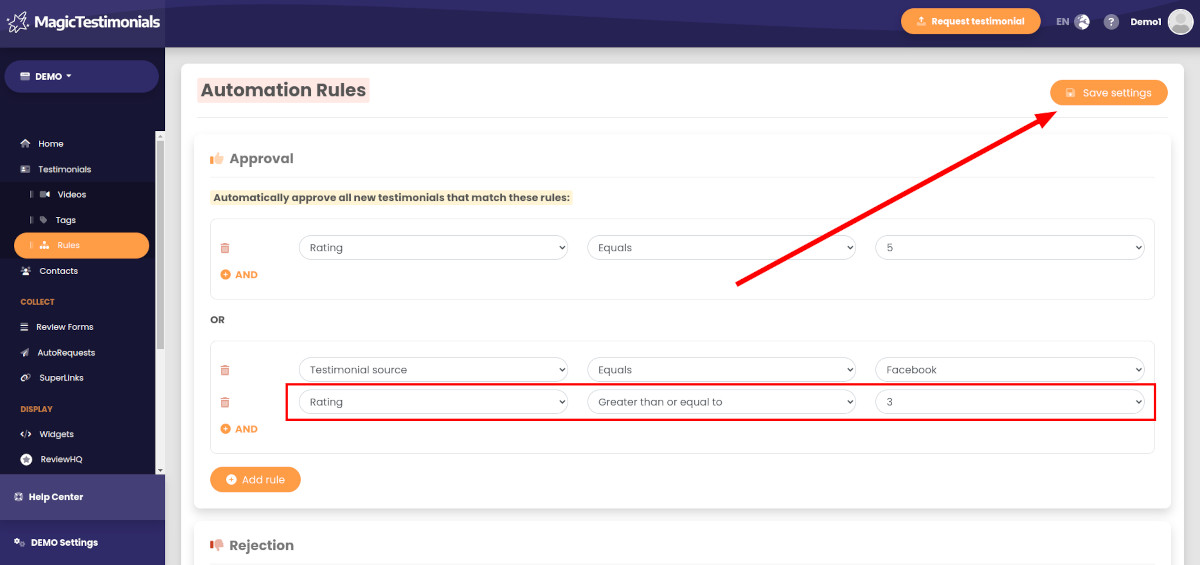
Click the “Save settings” button. That’s it for example #2.
Rejections #
Here we decide which testimonials are automatically rejected (not displayed and made inactive in the testimonials list).
Let’s see some examples.
Example #3: Rating #
Aim: automatically reject testimonials with a rating less than 4.
- Click “Add Rule”.
- Select “Rating” as criteria.
- Choose the operator “Less than or equal to”.
- Then select “3” as the rating (not “4” because it is also equals to).
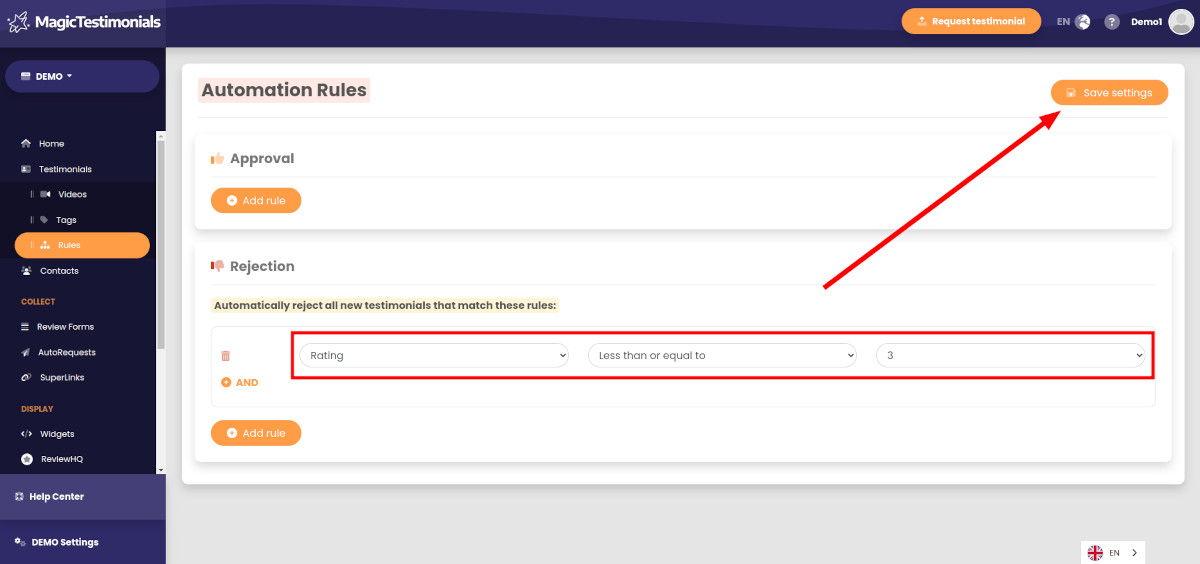
Click the “Save settings” button. That meets the objective for example #3.
Note: this is similar to our first “Approvals” example. The difference is that those not rejected will stay (unapproved) in the testimonials list ready for manual intervention.
Example #4: Rating and Testimonial Source #
Aim: reject testimonials with a rating less than or equal to 2 automatically, except from a Google listing. For those, we want to reject any with a rating less than 4.
In other words, any rating with 2 or less will be automatically rejected, regardless of the source. So we will start with that.
- Click “Add Rule”.
- Select “Rating”.
- Choose “Less than or equals to”.
- Then select “2”.
Now we move on to Google rule.
- Click “Add Rule” (and again we see “OR” between our rules).
- Select “Testimonial Source”.
- Now select “Equals”.
- For the source, choose “Google”.
- Click “AND” (below the boxes).
- Select “Rating”.
- Choose “Less than or equal to”.
- Then select “3”.
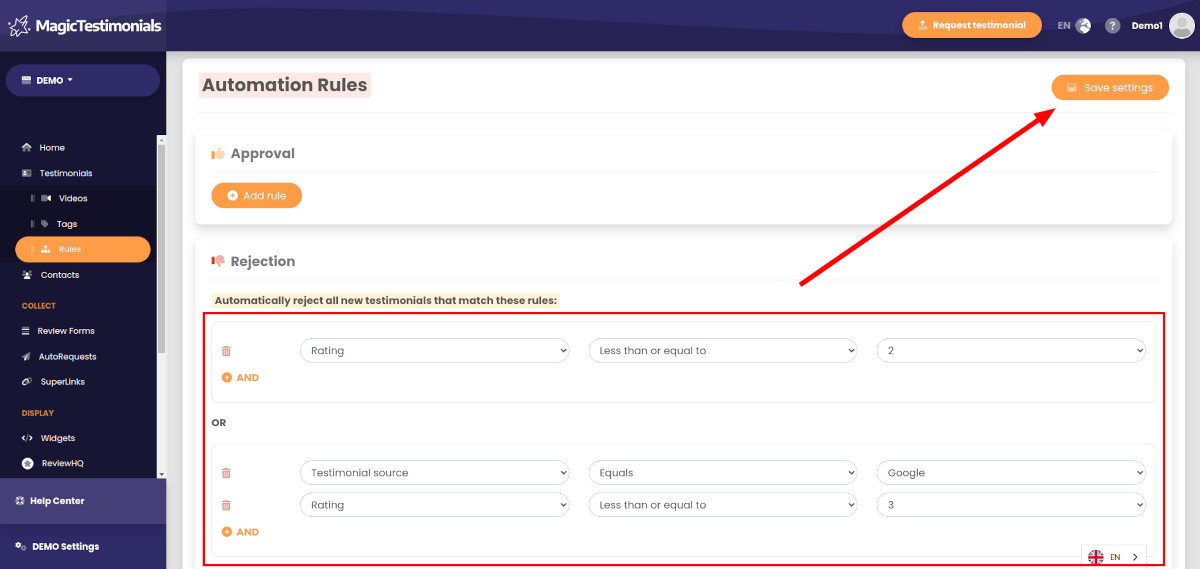
Click the “Save settings” button. That completes example #4.
Combining Approval and Rejection Rules #
Approval and Rejection rules can be used together in Magic Testimonials Display App. This gives you a fine degree of control over the automated process.
Example #5: Rating and Testimonial Sources #
Aim: testimonials automatically accepted with a rating of 3 or more except those submitted through Review Forms, which we would prefer to check manually. In addition, Facebook reviews with a rating less than 4 should be rejected.
So, any testimonial with a rating of 3 or more can be automatically accepted, except those from Review Forms.
We start with “Approvals” and add a new rule.
- Select “Rating”.
- Next choose “Greater than or equal to”.
- Then select “3”.
Now, because we want to read and approve testimonials from Review Forms manually, we exclude them from the automation.
Click “AND” (below the boxes).
- Select “Testimonial Source”.
- Next choose “Does not equal”.
- Then select “Review form”.
That is it for the “Approvals” part of our example.
Now we move on to Facebook rule. In “Rejections” add a new rule.
- Select “Testimonial Source”.
- Next choose “Equals”.
- Then select “Facebook”.
Click “AND” (below the boxes).
- Select “Rating”.
- Choose “Less than or equal to”.
- Then select “3”.

Click the “Save settings” button.
With the “Approvals” and “Rejection” parts done, that completes example #5.
Note: The “Rejection” rule will override the “Approval” rule. In this case, if a testimonial from Facebook has a rating of 3 it won’t be accepted because we added a rejection rule to reject Facebook testimonials with a rating of 3 or less.
Summary #
We hope you found this tutorial helpful.
If you have any suggestions on improving this tutorial or if you need any help with automating your testimonials (and approval and rejection rules), you can contact us.


